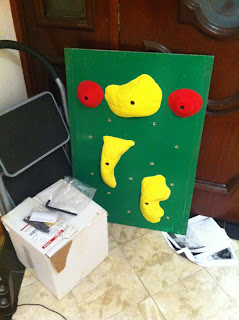
Prepare to get psyched - there's too much awesome. Since the holidays started, I said I would want to get a slopeymon, right? But eventually I figured I may as well invest the time making a woody, since that would mean that I could just get a bunch of holds and do some training on it, right?
So that's pretty much exactly what I did, and over the last week or so I've set up my own woody. It wasn't too difficult, in fact it was pretty much more straightforward then I thought, and it was relatively cheap too. The reason why I say relatively cheap was that, had I gotten slopeymon and just installed him, then he would've taken about 150 all up. However, junking all the things together to get the woody cost around 180/190, which wasn't that much more expensive - and I had a lot of fun in the process! So here's how the woody developed.
There's the first photo of the woody after I had finished drilling all holes into the back. I used a 7/16 drill piece so that the T-nuts would fit in, and as you can see there are 18 holes in the training board. I spaced them 8 inches from each other, in that grid pattern (spaced about 8 inches from each other) - and it really doesn't take long to set all of that up. A couple of things to note - there are plenty of websites out there that are going to tell you exactly how to set up the woody, and they're all great - but don't worry about the T-nuts looking slightly unsteady on the back; when you're screwing them in, then they'll tighten right up - I haven't had any trouble with any of the T-nuts (yet), and we've abused the training board fairly well over the last few days.
The overall cost for the woody wasn't too bad; and it's one that'll stay relatively constant, especially if you're going to keep reusing it/make another woody after a while. We've got a mind to transform the specific area into an entire wall, which should be pretty cool and if we do there'll be a lot more info coming on that in the future.
- T-nuts; 18 T-nuts; Had to get them in packs of 4; So about $20 for 5 packs
- Socket-bolts; have to get them from specialised carpentry stores; we got 10 (5x2inch, 5x3inch) and the Hex-Key for $30.
- Had the sheet of wood at home
- Screws, Power tools, etc. all at home.
Setting it up really isn't that difficult, you just have to make sure that it'll support your weight which we were pretty tentative about sorting out over the first few runs. Just pre-drill the holes into the wood and punch in the screws with the drill. We added the metal plates just to add some extra stability.
We've used it now for a few weeks and it does great; just make sure you have a crash pad underneath you, and a spotter if you've got any sharp bits of brick sticking out. I'll add a training video later - I'm having some pretty awesome fun with it ;)
.JPG)

